What Is Hyperfocal Distance?
Hyperfocal distance is the closest focusing distance where elements in your composition at ‘infinity’ are acceptably sharp. Infinity is the most extreme distance your lens can focus to. If you want to focus on an element in the foreground and keep your background in focus, you need to know how to calculate the hyperfocal distance. It is different for every lens focal length. You might ask, “Isn’t stopping down my lens to its narrowest aperture going to make everything in focus?” Not necessarily. A narrow aperture will give you more depth of field. But it will not always produce and image which is acceptably sharp in the background. There are more variables in the physics of focusing lens optics that come into play.
Finding the Sweet Spot – Calculating Hyperfocal Distance
Focusing on an object closer to your camera will give you less depth of field at any aperture setting. Focusing on an object which is further from your camera will give you more depth of field. Finding the sweet spot with any aperture setting is what we are looking for. When you have your lens set at its hyperfocal distance you will achieve the maximum depth of field in your photo. This distance calculation is based on three main variables: At any lens’s hyperfocal distance everything from half the distance you are focused at to infinity will be acceptably sharp. Let’s say you are using a 35mm lens with your aperture set to f11 on a full frame camera. With the focus set at 6 meters, everything from 3 meters to infinity will be acceptably sharp. Six meters is your hyperfocal distance.
Four Ways to Calculate Hyperfocal Distance
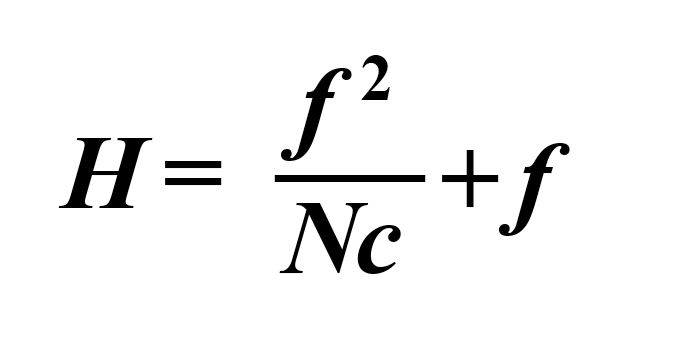
1. Use the Formula
This has to be the least attractive and most difficult method. It involves way too much algebra for me and most people I know.
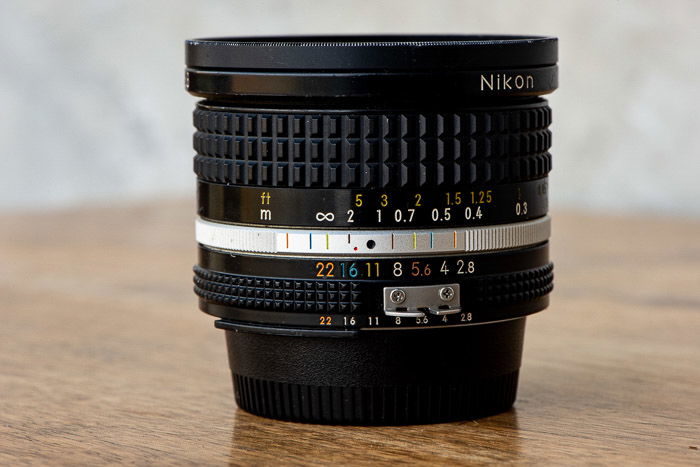
2. Use an Old Lens
Older lenses (and some newer ones), have markings on the lens barrel you can use to calculate the hyperfocal distance. Here is an example showing a 20mm lens set at f11. Setting the lens infinity symbol to the middle of the corresponding marker, (the left-hand yellow line in this case,) will give you the hyperfocal distance. Everything from about 0.7 meters, (indicated by the right-hand yellow line,) to infinity will be acceptably sharp. These markings are for full frame cameras only and will be incorrect for any other sensor size. If you don’t have a lens with these markings and are not a whizz at algebra, there are two easier ways you can use.
3. Use a Chart
There are lots of charts available online to show you the hyperfocal distance for any focal length lens. Printing out a chart like this you can carry it with you and refer to it when setting focus on your lens. Make sure you use a chart correct for your camera’s sensor size.
4. Download an App
I like to use Hyperfocal DOF, available free for both Android and iOS. This smart little app allows you to enter your camera and lens information and settings and provides the hyperfocal distance. One main benefit of using an app like this is it allows you to more precise when calculating the hyperfocal distance if you are using a zoom lens. Most charts will only give you the distance for prime lenses, but not intermediary focal lengths.
Keep These Factors in Mind
The shorter your focal length, the closer the hyperfocal distance. The higher you set your f-stop, the closer the hyperfocal distance will be. The larger your sensor, the closer the hyperfocal distance will be. If you are using the same focal length on a crop sensor the hyperfocal distance will be further away.
What Is ‘Acceptably Sharp’?
This term always comes up in discussions about hyperfocal distance. You may think it is somewhat vague, it does appear that way. What acceptably sharp is depends on something called the ‘circle of confusion’ which seems equally ambiguous. Camera lenses do not focus light rays perfectly. At best a point of light is rendered as a spot, rather than a distinct point. The very smallest spot a lens can produce is called the circle of confusion. When your lens is focused, a single point of light on the plane of focus will be sharper than if it were in front or behind it. The further from the actual point of focus the less sharp it becomes. When your lens is set to the hyperfocal distance, points of light anywhere in the range will be within the circle of confusion. They will be considered acceptably sharp. Opening your aperture wider, changing your focus or moving your camera closer to the point will alter the circle of confusion. Parts of the photo may no longer be acceptably sharp. This series of photos may help you understand the circle of confusion. Each was made with a 105mm lens on a full frame camera. The lens aperture was set at f3.2. The glass is in focus. The small LED lights on the background are obviously out of focus. They appear much larger than the very small lights which they are. As I moved the camera closer to the glass, and kept it in focus, the shapes of the blurred lights in the background appear larger. The same thing happens with single points of light, but I cannot practically illustrate that in photographs. Depending on how the photo is displayed the level of acceptable sharpness can vary. A high definition print will display more detail than a projected image or one viewed on a low resolution monitor. Acceptable sharpness is measured by at what point the spot appears indistinguishable from a point to the human eye. Do you want to geek out and dig into understanding the concept of acceptable sharpness and the circle of confusion? Filmmaker IQ has an excellent video with superb animations called “The Science of Deep Focus and the Hyperfocal Distance”.
Using the Hyperfocal Distance for Creative Photos
Taking technically correct photos is important to many people. Other people are not so concerned about getting everything right by the book. Making photos using hyperfocal distance calculated correctly will result in very sharp images. They may not necessarily be interesting images just because they are technically correct. I do not use the hyperfocal distance technique often. Generally, when I am photographing landscapes or wide scenes I include an element of interest in the foreground. This is usually closer to the lens than the minimum focusing distance possible for everything else in the photo to be sharp In my photo above of the dahlia flower, it is close to the lens and in focus. I was using a 35mm lens set at f11. Even though my lens is a medium wide angle and my aperture was f11, the background is out of focus. For the flower and the background to all be acceptably sharp I would have had to move too far back from the flower. At f11 the hyperfocal distance for my 35mm lens is 3.79 meters so the flower would be very small in the frame. Photographing larger objects and maintaining an interesting composition is easier. This is because you can be much further back from your subject to frame it well. This then brings it within the range of the hyperfocal distance of your lens. For example, my photo of the plane below. I was using a 50mm lens on a full frame camera. The lens was set to f10. I have focused on the windscreen of the plane. It must be 8.66 meters or further away because this is the hyperfocal distance. The joints in the plane’s fuselage near the nose are sharp, as is the detail in the background.
Conclusion
It’s very trendy amongst photographer to work with a very shallow depth of field. Sometimes it’s easy to forget to close the aperture down, take a few steps back and make images which are really sharp. Consider your subject. Think about the whole scene. Don’t get stuck on making blurred photos just because that’s what you do. Understanding hyperfocal distance can help you make more interesting photographs. Knowing when to pull out your chart or app to help with the calculation takes some practice. You must choose opportunities to use this technique carefully. It is not a technique you will want to use all of the time, even if you predominantly photograph landscapes. Sticking rigidly to a particular photography technique, such as hyperfocal distance calculation, can result in dull photos. It’s important to find the balance between the technical aspects and creative expression. Technically correct photos can still be very lifeless photos. Technical accuracy does not alone make a good photo. Seek to creatively use of the hyperfocal distance technique next time you are out with your camera.


title: “How To Use Hyperfocal Distance For Sharper Photos” ShowToc: true date: “2023-01-11” author: “Ricky Redd”
What Is Hyperfocal Distance?
Hyperfocal distance is the closest focusing distance where elements in your composition at ‘infinity’ are acceptably sharp. Infinity is the most extreme distance your lens can focus to. If you want to focus on an element in the foreground and keep your background in focus, you need to know how to calculate the hyperfocal distance. It is different for every lens focal length. You might ask, “Isn’t stopping down my lens to its narrowest aperture going to make everything in focus?” Not necessarily. A narrow aperture will give you more depth of field. But it will not always produce and image which is acceptably sharp in the background. There are more variables in the physics of focusing lens optics that come into play.
Finding the Sweet Spot – Calculating Hyperfocal Distance
Focusing on an object closer to your camera will give you less depth of field at any aperture setting. Focusing on an object which is further from your camera will give you more depth of field. Finding the sweet spot with any aperture setting is what we are looking for. When you have your lens set at its hyperfocal distance you will achieve the maximum depth of field in your photo. This distance calculation is based on three main variables: At any lens’s hyperfocal distance everything from half the distance you are focused at to infinity will be acceptably sharp. Let’s say you are using a 35mm lens with your aperture set to f11 on a full frame camera. With the focus set at 6 meters, everything from 3 meters to infinity will be acceptably sharp. Six meters is your hyperfocal distance.
Four Ways to Calculate Hyperfocal Distance
1. Use the Formula
This has to be the least attractive and most difficult method. It involves way too much algebra for me and most people I know.
2. Use an Old Lens
Older lenses (and some newer ones), have markings on the lens barrel you can use to calculate the hyperfocal distance. Here is an example showing a 20mm lens set at f11. Setting the lens infinity symbol to the middle of the corresponding marker, (the left-hand yellow line in this case,) will give you the hyperfocal distance. Everything from about 0.7 meters, (indicated by the right-hand yellow line,) to infinity will be acceptably sharp. These markings are for full frame cameras only and will be incorrect for any other sensor size. If you don’t have a lens with these markings and are not a whizz at algebra, there are two easier ways you can use.
3. Use a Chart
There are lots of charts available online to show you the hyperfocal distance for any focal length lens. Printing out a chart like this you can carry it with you and refer to it when setting focus on your lens. Make sure you use a chart correct for your camera’s sensor size.
4. Download an App
I like to use Hyperfocal DOF, available free for both Android and iOS. This smart little app allows you to enter your camera and lens information and settings and provides the hyperfocal distance. One main benefit of using an app like this is it allows you to more precise when calculating the hyperfocal distance if you are using a zoom lens. Most charts will only give you the distance for prime lenses, but not intermediary focal lengths.
Keep These Factors in Mind
The shorter your focal length, the closer the hyperfocal distance. The higher you set your f-stop, the closer the hyperfocal distance will be. The larger your sensor, the closer the hyperfocal distance will be. If you are using the same focal length on a crop sensor the hyperfocal distance will be further away.
What Is ‘Acceptably Sharp’?
This term always comes up in discussions about hyperfocal distance. You may think it is somewhat vague, it does appear that way. What acceptably sharp is depends on something called the ‘circle of confusion’ which seems equally ambiguous. Camera lenses do not focus light rays perfectly. At best a point of light is rendered as a spot, rather than a distinct point. The very smallest spot a lens can produce is called the circle of confusion. When your lens is focused, a single point of light on the plane of focus will be sharper than if it were in front or behind it. The further from the actual point of focus the less sharp it becomes. When your lens is set to the hyperfocal distance, points of light anywhere in the range will be within the circle of confusion. They will be considered acceptably sharp. Opening your aperture wider, changing your focus or moving your camera closer to the point will alter the circle of confusion. Parts of the photo may no longer be acceptably sharp. This series of photos may help you understand the circle of confusion. Each was made with a 105mm lens on a full frame camera. The lens aperture was set at f3.2. The glass is in focus. The small LED lights on the background are obviously out of focus. They appear much larger than the very small lights which they are. As I moved the camera closer to the glass, and kept it in focus, the shapes of the blurred lights in the background appear larger. The same thing happens with single points of light, but I cannot practically illustrate that in photographs. Depending on how the photo is displayed the level of acceptable sharpness can vary. A high definition print will display more detail than a projected image or one viewed on a low resolution monitor. Acceptable sharpness is measured by at what point the spot appears indistinguishable from a point to the human eye. Do you want to geek out and dig into understanding the concept of acceptable sharpness and the circle of confusion? Filmmaker IQ has an excellent video with superb animations called “The Science of Deep Focus and the Hyperfocal Distance”.
Using the Hyperfocal Distance for Creative Photos
Taking technically correct photos is important to many people. Other people are not so concerned about getting everything right by the book. Making photos using hyperfocal distance calculated correctly will result in very sharp images. They may not necessarily be interesting images just because they are technically correct. I do not use the hyperfocal distance technique often. Generally, when I am photographing landscapes or wide scenes I include an element of interest in the foreground. This is usually closer to the lens than the minimum focusing distance possible for everything else in the photo to be sharp In my photo above of the dahlia flower, it is close to the lens and in focus. I was using a 35mm lens set at f11. Even though my lens is a medium wide angle and my aperture was f11, the background is out of focus. For the flower and the background to all be acceptably sharp I would have had to move too far back from the flower. At f11 the hyperfocal distance for my 35mm lens is 3.79 meters so the flower would be very small in the frame. Photographing larger objects and maintaining an interesting composition is easier. This is because you can be much further back from your subject to frame it well. This then brings it within the range of the hyperfocal distance of your lens. For example, my photo of the plane below. I was using a 50mm lens on a full frame camera. The lens was set to f10. I have focused on the windscreen of the plane. It must be 8.66 meters or further away because this is the hyperfocal distance. The joints in the plane’s fuselage near the nose are sharp, as is the detail in the background.
Conclusion
It’s very trendy amongst photographer to work with a very shallow depth of field. Sometimes it’s easy to forget to close the aperture down, take a few steps back and make images which are really sharp. Consider your subject. Think about the whole scene. Don’t get stuck on making blurred photos just because that’s what you do. Understanding hyperfocal distance can help you make more interesting photographs. Knowing when to pull out your chart or app to help with the calculation takes some practice. You must choose opportunities to use this technique carefully. It is not a technique you will want to use all of the time, even if you predominantly photograph landscapes. Sticking rigidly to a particular photography technique, such as hyperfocal distance calculation, can result in dull photos. It’s important to find the balance between the technical aspects and creative expression. Technically correct photos can still be very lifeless photos. Technical accuracy does not alone make a good photo. Seek to creatively use of the hyperfocal distance technique next time you are out with your camera.
